| My Cart | My Acc. | Dealers | Index | ||||||
| Manuals | Affiliate |  |
Help |
|
|
|||||||||||||||||||||||||||||||||||
| Browse By Brands: | ||||||||||||||||||||||||||||||||||||
|
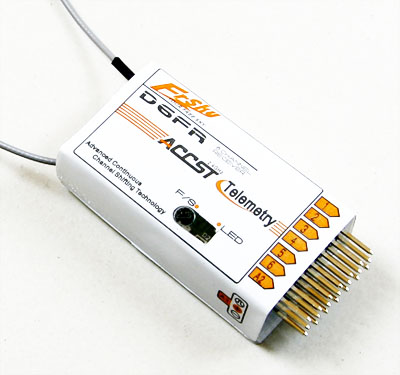
FrSky 2.4G 6-channel Two Way Communication Receiver D6FR |
|
|||||||
|
|||||||||
| Tags: FrSky 2.4G 2.4GHZ two-way 2-way accst telemetry |
Setup
2.1 Bind procedure:
1) Turn your transmitter on and switch it to PPM mode (if not set). Turn your transmitter off.
2)Turn your transmitter on while holding the F/S button on the transmitter module (Please make sure that both switches on the transmitter module are OFF in two way mode) Release it in a few seconds. The RED LED on the transmitter module will flash, indicating the transmitter is ready to bind to the receiver.
3) Connect battery to the receiver while holding the F/S button on the receiver. The LED on the receiver will flash, indicating the binding process is completed.
4) Turn on the transmitter and connect battery to the receiver. The Green LED on the receiver will indicate the receiver is receiving commands from the transmitter.
2.2 Range check:
It is highly suggested to perform pre-flight range check. Caution must be paid when you perform range check in environment with metal fences, concrete buildings, or rows of trees. Loss of signal may be experienced from reflections.
Please kindly follow the steps below to perform range check: (Note: this would be done with the receiver installed in the model):
1) Place the model at least two feet (60cm) above non-metal contaminated ground (like wooden bench).
2) Place the receiver’s antennas apart. Do not let the antennas touch the ground.
3) Place the antenna of the transmitter in a vertical position.
4) Turn on the transmitter and receiver, press the F/S button of the transmitter for 4 seconds to enter range check mode, the RED LED of the transmitter module will be off, GREEN LED will flash rapidly, the BEEPER will sound. The effective distance will be decreased to 1/30 of full range.
5) Walk away from the model while simultaneously operating the controls on the transmitter, confirming that all controls are completely and correctly operational at least 30 meters away.
6) Press the F/S button for 1S-4S, the transmitter will exit range check mode. RED LED will be back on.
2.3 Setting failsafe:
D6FR supports failsafe function for all channels. Please kindly follow the steps below to set failsafe:
1) Bind the receiver first.
2) Set failsafe at any required position on any channel.
3) Press briefly the F/S button of the receiver (less than 1 second), the transmitter module will make a long “beep”, indicating the failsafe position is remembered by the receiver.
If you do not need the failsafe function any more, just re-bind the receiver to set default failsafe mode.
2.4 LED status:
| RED LED | GREEN LED | Mode |
| On | Glooming | Working Mode |
| Flash | Off | No Signal |
| Flash | On | Binding OK |
2.5 Definition for AD1 (internal):
| Max Lipo Pack Count | Division Ratio | Max Pack Voltage |
| 3S | 4:1 | 13.2V |
Definition for AD2:
| Division Ratio | Max Voltage |
| 1:1 | 3.3V |
3.How to switch between two PPM modes
Turn the transmitter off, connect the battery to the receiver, press the F/S button of receiver for 6 seconds and then release. The red LED will flash fast in HS Mode and slow in FS Mode.
Warning: HS Mode is only applied for high-speed digital servos. Other servos should select FS Mode, otherwise servos will get heat or even burn out.
|
©2003-2026 HiModel All Rights Reserved. |
|
|