SAFETY PRECAUTIONS£º
Because
of the speed and mass of this boat, it is capable of inflicting
property damage and severe personal injury if a collision occurs. Never
run this boat in the presence of swimmers or where the possibility of
collision with people or property exists.
This
boat is controlled by radio signals, which are subject to possible
interference from other R/C transmitters, paging systems or other
electrical noise. Before turning your radio on, make sure no one else
in the area is operating a radio on the same frequency (channel).
If
the buyer is not prepared to accept the liability associated with the
use of this product, the buyer is advised to return this kit
immediately in new and unused condition to the place of purchase.
SPECIFICATION DATA£º
Length: 800 mm (31.5in)
Height: 1520 mm (60in)
Sail area: 24 d©O
Net weight: 1400g (50oz)
Hull Material: handmade fiberglass-reinforced plastics
Mast: aldural
Sail: Synthetic polyester fabric
Recommended electronic equipment:
- 2CH radio and receiver
- 4 cells 3AA Ni-MH battery
- Standard Servo
- S3801or S5801 Servos that have strong torque. (Of course, you can use any other servos that have the similar performance.)
Note: Fixing positions in the hull have been reserved for the installation of the servos.
Thank
you for purchasing BLUEARROW NAVIGATOR R/C 800 Sailboat! We know how
exciting a new R/C boat purchase can be and we know you¡¯re anxious to
get started when get this brand new sailboat that both good-looking and
excellent in sail ability, but please take time to read the
instructions carefully and completely before attempting to operate your
model. This manual contains the instructions you need to safely build,
operate, and maintain your R/C sailboat.
Warranty
BLUEARROW
will warrant the NAVIGATOR B/C 800 Sailboat for 90 days after the
purchase from defects in materials or workmanship. BLUEARROW will
either repair or replace, at no charge, the incorrectly made part.
Make
sure you save the receipt or invoice you were given when you bought
your model! It is your proof of purchase and we must see it before we
can honor the warranty.
If for any reason
you think that this model is not for you, return it to your local
dealer immediately. PLEASE NOTE: Your hobby dealer cannot accept a
return on any model after the final assembly sequence has begun.
REPAIR SERVICE£º
Repair service is available anytime.
After
the 90-day warranty, you can still have your NAVIGATOR B/C 800 sailboat
repaired for a small charge by the experts at BLUEARROW¡¯s authorized
repair facility, or send the kit to the dealer where you buy from and
let tem to return the kits to our experts for repair.
To speed up the repair process, please follow the instructions below.
1. Under all circumstances return the ENTIRE system and boat.
2. Send written instructions which include: a list of all items returned a THOROUGH explanation
of the problem, the service needed and your phone number during the
day. If you expect the repair to be covered under warranty, be sure to
include a proof-of-purchase date (your store receipt or purchase
invoice).
3. Also be sure to send your full return address.
SPECIFICATION & DESCRIPTION CHANGES£º
All
pictures, descriptions, and specifications found in this instruction
manual are subject to change without notice. BLUEARROW maintains no
responsibility for inadvertent errors in this manual.
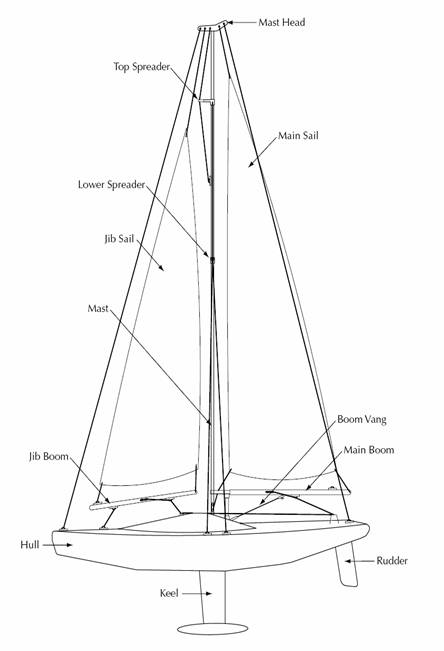
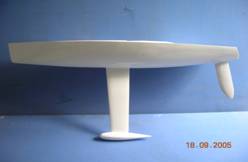
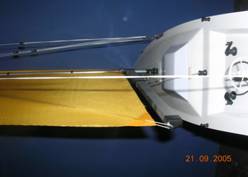
BASIC BOAT TERMINOLOGY£º
Tough you have been or going to being an expert of sailboat, there is still necessary to state out these basic terminologies.
(Please compare wit the picture below)
BOW: The front of the boat.
STERN: The back of the boat.
PORT: This
is the left side of the boat when aboard and facing the front (bow). An
easy way to remember this is that port and left both contain four
letters.
STARBOARD: This is the right side of the boat when aboard and facing the front (bow).
HULL: The body of the boat.
DECK: The top of the boat.
KEEL: A weighted blade that protrudes from the bottom of the hull as a means of providing lateral stability.
RUDDER: The hinged vertical plate mounted at the stern that controls steering.
FINAL ASSEMBLY£º
Carefully open the pack box.
Carefully remove your NAVIGATOR B/C 800 sailboat and all remaining components from the box.
Take
out the sail covered on the hull first, and then take the mast out,
please note that there are components in the small boxes that placed
before and after the hull.
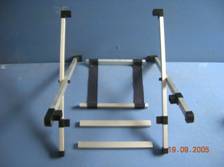
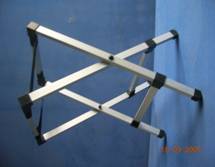
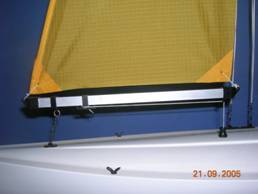
ASSEMBLE THE STAND£º
Please set all the various components of the boat stand on the metal pole as shown.
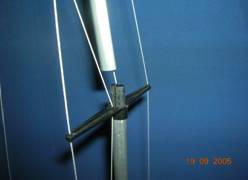
Assembles
the X stand of the two side, please do not forget to install the
circular filling piece at the crossing. Link them with four short
metals poles and then fix them by glue.
ASSEMBLE THE HULL, KELL AND MASTER£º
Remove the lower thumbnut from the keel shaft and insert it into the hole on the ballast.
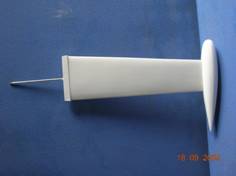
Replace the thumbnut and tighten firmly.
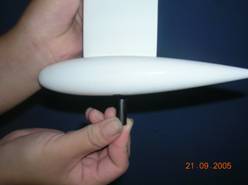
Remove
the upper thumbnut from the keel, and insert it to the bottom hole of
the hull, install the nut in the round hole on the deck, and screw
tightly enough with the spanner.
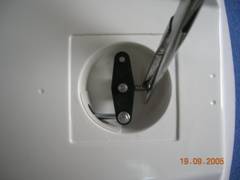
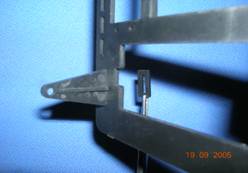
Insert
the rudder shaft up through the small hole at stern. The rudder is
shaped so that it will only fit one way. Tighten the thumb screw on the
rudder control arm firmly making sure that it contacts the flat spot on
the rudder shaft. Replace the rear hatch, and paste the sticker on it.
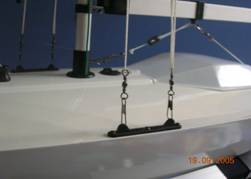
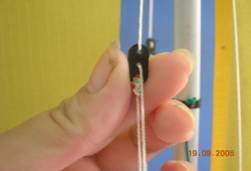
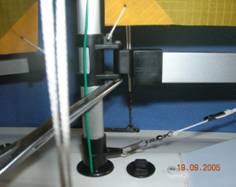
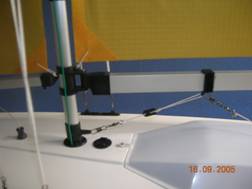
Connected
the upper and lower masts together tighten, and Insert the bottom of
the mast in to the mast base. Spread the several of lines separately;
hook the hook into the hole of the deck. Tighten the lines by adjusting
the adjustment blocks (bowsies). It is important to make sure that the
mast is as straight as possible.
Tighten the lines by adjusting the adjustment blocks (bowsies)
Make sure that the mast is as straight as possible.
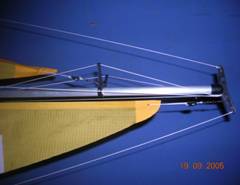
Spread
out the sail carefully, hook the bottom of the backsail into the eyelet
of the deck and hook the top of the foresail into the hole of the top
spreader. Put the front of the main boom into the hole on the mast and
fix it with screw. Hook the top the main sail through the eyelet of the
mast head, and fasten the left bottom through the lower eyelet.
Cut
a certain length of receiver lead wire and tread through the eyelet of
the mast, and then trough the hole on the deck to connect with the
receiver.

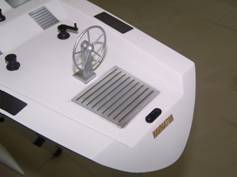
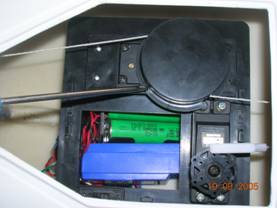
INSTALL THE CONTROL SYSTEM£º
Declaration:
NAVIGATOR R/C 800 Sailboat can be controlled conveniently and reliably,
you can use any appropriate sail winch and servos that have big torque.
We only take the FUTABA series servo as the example here, we believe
that other similar servos are also usable
Install the servo (take Futaba S3801 as example)
.Insert the triangle stand into the mounting panel hole, install the fix plate on the reverse side and fix it with glue.
(Take Futaba S5801 as example)
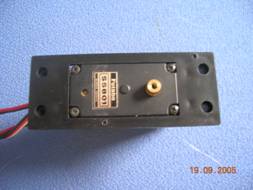
Hitch
the small mounting plate around the sail winch, and fix with 4 screws
on the reverse side, please don¡¯t install reversely of the hole
direction on the plate.
Install
the servo and sail winch into the larger mounting plate and fixed with
screw, please don¡¯t reverse the direction, and then install the switch
of the battery box.
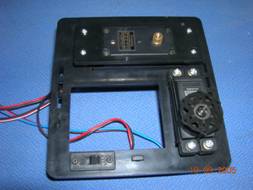
Place the mounting plate on the stand in the hull and fixed with glue, sandwich the arm of the rudder on the servo.
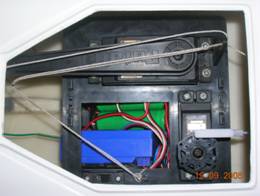
ATTACH THE SAIL CONTROL LINES£º
Servos with big torque (take Futaba S3801 as an example)
Thread
the line that has an approximately length of 70 cm through the round
hole of the deck front part into the hull, and thread the line that has
an approximately length of 50 cm through the round hole of the deck
back part into the hull. Then tread through the two lines in the hull
from the right side of the triangle stand to the round hole, pass
through the ring of the control arm, and finally fasten the line in the
square hole of the mounting plate.

Adjust
the coil at the edge of the backsail and fix it at the position as
shown. Attach the end of the jib control line to the jib boom cleat by
coiling the line around the cleat several times and tucking the end of
the line through the coils.
Adjust
the coil on the main boom to the position as shown, connect to the boom
vang, and fasten the control line into the hole of the hook.
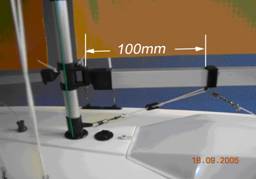
Adjust
the length of the lines. Turn on the radio, pull the left stick of the
transmitter all the way down, and the rudder arm should stop at the
position as shown in the picture. (the position where sail is fastened)
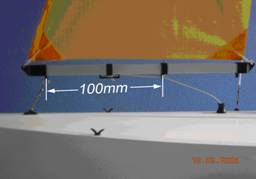
Adjust
the length of the back and fore control lines so that the booms have
about 2¡¯¡¯ of play as shown. When the left pole rises the sail should be
able to open. The picture shows the control arm¡¯s position when the
sail is opened.
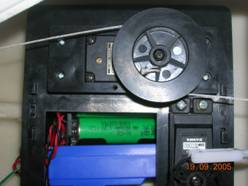
Sail Winch (take Futaba S5801 as an example)
Thread
the line that has an approximately length of 100 cm through the round
hole of the deck front part into the hull, and thread the line that has
an approximately length of 70 cm through the round hole of the deck
back part into the hull. Then tread the two lines in the hull through
hole of the sail winch wheel and fasten them together. Please note that
the back part of the line is in the level below.
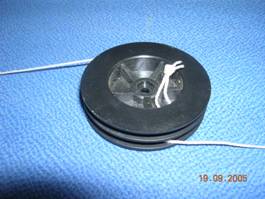
Coil
the two lines 4 roles separately in the circular slot according to the
direction as shown, please keep the line¡¯s direction the same with that
be shown in the picture when you install the wheel on the sail winch.
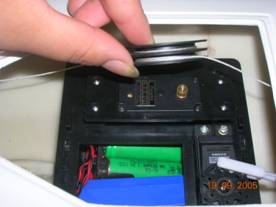
Open
the radio control, pull the left stick of the transmitter all the way
down, the sail winch should turn clockwise, otherwise please adjusts
the reverse switch.
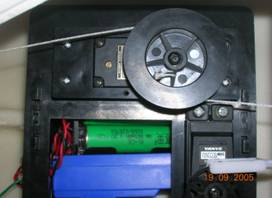
Please
turn of the receiver until the sail winch stop rotating, and cover the
wheel, fix it with 2 screws. Please keep it in mind that the lower gap
on the cover of the wheel is in behind.
Tread the line through the eyelet of the sweptback sail and fasten it on the cleat, coiling the lines around several times.
Adjust
the coil on the main boom to the position as shown, connect to the boom
vang, and fasten the control line into the hole of the hook.
Adjust the length of the back and fore control lines so that the booms have about 2¡¯¡¯ of play as shown.

Turn
on the radio, when the sail left stick is moved up, you should be able
to open the sails.The wheel of the sail winch can have a turn of
approximately 3 rotations when reach the max position. Otherwise,
please adjust the adjusting device on the sail winch or installs the
spacing installment on the left pole.
SAILING THE PARADISE SAILBOAT
Unlike
propeller driven boats that you basically point and accelerate,
sailboats present an interesting challenge. Sailing requires constant
reaction to water movements, any wind gusts, and any wind direction
changes. These reactions then require adjustment of the rudder and
sails in order to find the best possible course. In some cases
transmitter adjustments are sufficient but at other times it will be
necessary to make physical adjustments of the sails via the rigging
lines. There is no substitute for actual ¡°on-the-water¡± experience and
after your first couple of outings you may want to read through this
manual again in order to help you to gain a better understanding of the
¡°art¡± of sailing. While learning to sail, it is a good idea to pick up
on as much sailing terminology as possible; this will make it easier to
grasp some aspects.
READING THE WIND
When
you get to your favorite pond, take a few moments to observe wind
direction, speed, and frequency of gusts and adjust your sailboat¡¯s
rigging as necessary. What follows are guidelines for tuning your
ship¡¯s sails and rigging, but with experience you will gain the ability
to fine-tune your sails and rigging for optimal performance, regardless
of conditions.
For light wind conditions (1-5 MPH): Use
the adjustment blocks (bowsies) located between the tops of the sails
and the masthead to tighten the sails so they will respond to the
slightest push from the wind.
For medium wind (6-10MPH): Loosen the sails slightly in order to find the most efficient combination of sail shape and tension. As a rough guideline, you will want it somewhere in between the light and high wind set-up.
For high wind conditions (11-15 MPH): Loosen
the jib and main sail further. They will be better able to handle the
high winds and your hull will be less likely to lie over on its side.
GETTING WHERE YOU NEED TO GO
Sailboats can easily sail downwind but
sailing against the wind can be quite challenging. In fact, sailboats
cannot sail directly into the wind and attempting to do so will leave
you in irons. Sailboats can sail at up to a 45¡ã angle against the wind, movements against the wind are known as tacking. Take a moment to study the diagram below as you read through these definitions.
DOWNWIND: Sailing with the wind coming from stern (a.k.a. running and sailing free).
IN IRONS: A
sailboat is said to be ¡°in irons¡± when the boat stalls with its bow
pointed directly into the wind with its sails struggling to fill with
air (luffing), keeping the boat from moving. If you find yourself in
this position, simply move the rudder stick to either side and hold it
until the sails catch some air. You will need to adjust the tension on
the sails with the sail control stick to get the boat moving. Release
the rudder when the ship reaches the desired heading.
LUFFING: When the sails are unable to fill with wind and begin flapping wildly (like a flag).
TACKING: Sailing towards the wind in a series of maneuvers diagonal to the wind source. There are basically two tacking directions. Starboard tack occurs when the wind comes from starboard and the sail boom hangs over the port side. Porttack is just the opposite, with the wind coming from port with the sail boom hanging over the starboard side.
There are varying degrees of tack angle and
it is important to learn when each will be useful and how to get your
sailboat into position, especially when racing. For instance, when
trying to reach a specific position upwind, sailing closehauled may be the most direct route. Sailing close reached
allows you to get upwind faster, but is not as direct. In any case, you
basically want the sails to be full of air and just on the verge of
luffing. Here are some terms that describe different sailing positions
in relation to the wind:
CLOSE-HAULED: You can sail up to a 45¡ã angle against the wind. Think of it as sailing ¡°close¡± to the wind with the sails ¡°hauled¡± in tight.
CLOSE-REACH: Nearly the same as close-hauled, but at less of an angle toward the wind. This allows the boat to reach greater speed.
BEAM REACH: Sailing with the boat at about a 90¡ã angle to the wind.
BROAD REACH: Sailing with the wind coming diagonally from behind (a.k.a. sailing large or quartering wind).
NEVER attempt
to swim after a stalled or stuck boat! Wait patiently for the wind
currents to return the boat to shore or use a tennis ball attached to
the end of a fishing rod to retrieve it.
Sailing
the NAVIGATOR in winds over 15 MPH is not advised. If you wish to sail
in conditions where wind speed is above 15 MPH, you may want to install
a high-torque sail servo.
It is dangerous to operate any R/C vehicle at any time that there is not sufficient light.
R/C models produce vibrations which will cause screws,nuts, bolts, etc, on your model to become loose overtime. It is important to make sure that all hardware is secure before operating your model.
CAUTION: Windy
conditions cause rough water that will affect the performance of your
sailboat and increase the chances of taking on water.
Your
Paradise sailboat may occasionally take on small amounts of water,
especially when running in high winds, rough water, and when making
tight turns. Keep a roll of paper towels handy and dry out the hull
interior after every run. Check for leaks if you notice excessive
amounts of water in the hull.
After running,
remove the hatch covers and allow the interior of the boat to dry out
completely. If you neglect to do this, it may result in corrosion of
the electronic components.
IMPORTANT: If,
for whatever reason, your boat takes on a large amount of water causing
the electronics to get wet, you must do the following immediately:
Remove the radio equipment from the boat. Allow the components to air
dry completely before reassembling. Reinstall the components and check
for proper operation before running the boat in water.
Total
run time of the NAVIGATOR R/C 800 sailboat is approximately 45-60
minutes (assuming you begin with new batteries in the receiver box).
When you notice a decrease in power or sluggish response, it means the
batteries are nearly drained and it¡¯s time to head for shore. As soon
as the boat reaches shore, turn off the power to the boat and
transmitter (in that order).
LAUNCH PROCEDURE:
1. Turn the power ¡°ON¡± to the transmitter and boat (in that order).
2.
Gently place the boat in water that is at least 12" deep and free of
obstacles (weeds, rocks, sticks, ducks, muskrats, etc.). The mast of
the NAVIGATOR R/C 800 sailboat is NOT A HANDLE. Do not hold the boat by the mast.
3.
Initially you will want to launch the boat downwind and note if the
boat has a tendency to turn right or left. Adjust the steering trim
lever on your transmitter until the boat runs in a straight line when
the steering control stick is at neutral.
4. When finished running, be sure to turn the power ¡°OFF¡± to your boat and transmitter (in that order).
5. When you are through sailing for the day, remove the keel and rudder and allow them to dry.
THE WAITING GAME
If
for whatever reason, you lose control of your NAVIGATOR R/C 800
sailboat, wind and water currents will slowly carry it toward shore.
The bad news is that the boat could be carried to the opposite shore.
Keep in mind things like wind direction and size of the pond or lake
when surveying areas to run your sailboat. We recommend that you do not
attempt to operate your sailboat on any ¡°free flowing¡± bodies of water
such as rivers or creeks.
If your boat gets
stuck in weeds or runs aground, use a fishing rod with at least 12lb.
line and a tennis ball tied to the end to retrieve it. Above all, NEVER attempt to swim after a stalledor stuck boat.
If you intend to run on salt water, be sure to do the following:
Tape the hatches shut for added protection.
Use petroleum jelly on the rudder and keel shafts.
Rinse thoroughly with freshwater after every run.
ORDERING REPLACEMENT PARTS
To order replacement parts for the NAVIGATOR R/C 800 sailboat, use the order numbers in the Replacement Parts List that
follows. Replacement parts are available only as listed and can be
purchased from hobby shops or mail order/ Internet order firms.
Hardware items (screws, nuts, bolts) are also available from these
outlets. If you need assistance locating a dealer to purchase parts,
visit WWW.BLUEARROW-RC.COM. If this kit is missing parts, contact to
the dealer where you buy the kit from.
REPLACEMENT PARTS LIST£º
Order # Item Description
BANA8001.....Mast & Boom Set ........Includes main mast and horizontal booms
BANA8200.....Sails ............................Includes jib and main sail (white, no graphics)
BANA8500......Hatch Set ....................Includes the main & rear hatch with hardware
BANA8600....Keel ............................Assembled keel with ballast and the nut to secure keel to the hull.
BANA8301.....Decal Set ....................Decal sheet with all six (6) trim schemes
BANA8004.....Rudder ........................Includes the rudder with rudder control arm.
BANA8400.....Sailboat Stand .............Complete stand (unassembled)
BANA8500......Instruction Manual......Guide for operating the NAVIGATOR R/C
800 sailboat
RACING
Although
it is very enjoyable to go out and run the Paradise sailboat by
yourself, we think the real fun and excitement is experienced when you
get involved in RACING! Racing does not have to be an organized and
sanctioned competition to be fun. In fact, small informal races can be
very exciting without the stress that comes with formal events.
Here are some suggestions for setting up a simple racecourse for boats:
- A BIG ENOUGH PLASTIC BOTTLE, OR A PIECE OF FOAM
- NYLON STRING (ENOUGH TO REACH BOTTOM)
- BOLT, ROCK OR HEAVY OBJECT FOR ANCHOR
-
Make
2 to 4 simple and inexpensive ¡°marker buoys¡± with empty plastic bottle
or a piece of foam, string, and heavy objects for anchors, similar to
the above sketch.
For ¡°oval racing¡± place the buoys similar to the above sketch. NOTE: The
above patterns are not based on any sort of official standards;
therefore, you may set up race courses any way you desire, using your
imagination to make the races more interesting. Usually the smaller
courses will provide more action and excitement.
The
length of the races can be determined by a set number of laps around
the buoys (for example, the first boat to complete 5 laps is the
winner); or by time (for example, whoever is leading at the end of two
minutes is the winner).
Do not despise this simple competition, if has not passed through a certain time of training, you can not sail well for certain.
Hope you can carry on the endeavor, and may you success!